When it comes to prepping, knowing how to perform hands-on maintenance on your equipment can be as crucial as stocking up on supplies. One of the less glamorous, but sometimes necessary tasks is draining a fuel tank. Whether you’re cleaning out old fuel, dealing with contamination, or preparing your vehicle for long-term storage, understanding the process can save you time, money, and potential hazards down the road. In this guide, we’ll walk you through the steps to drain a fuel tank safely and efficiently—using plain language and clear instructions, so even if you’re new to prepping tasks, you’ll be ready to tackle it with confidence.
Why Drain a Fuel Tank?
Before you jump in, it’s important to know why you might need to drain a fuel tank:
- Contaminated Fuel: Over time, fuel can collect water, rust, or sediment. Draining and cleaning can prevent engine damage.
- Old Fuel: Gasoline degrades with time. Removing old fuel helps avoid performance issues or costly repairs.
- Long-Term Storage: If you’re storing a vehicle for months or years, draining the tank reduces the risk of corrosion or fuel system problems.
- Repurposing or Maintenance: Whether you’re planning to clean the tank for a rebuild or repurpose the fuel for other safe uses, draining is a necessary step.
Understanding your “why” makes it easier to follow through safely.
Related: 6 Ways to Siphon Gas in A Survival Situation
Safety First: Precautions You Must Take
Fuel is highly flammable and can be hazardous if not handled properly. Always remember these safety tips:
- Work Outdoors: Always work in a well-ventilated, open area away from sparks, flames, or any ignition source.
- Protective Gear: Wear safety glasses, gloves, and long sleeves to protect your skin from splashes.
- Fire Extinguisher: Keep a Class B fire extinguisher nearby in case of emergency.
- No Smoking: Never smoke or allow any open flame near your work area.
- Proper Tools: Use tools that are rated for fuel handling to prevent sparks or static discharge.
Taking these precautions seriously can mean the difference between a successful job and a dangerous accident.
Tools and Materials Needed
 Before you begin, gather the following items:
- Fuel-safe container: A clean, approved container for collecting drained fuel.
- Wrenches: To loosen any fittings or bolts.
- Siphon pump or fuel transfer pump: Optional but very useful if you prefer not to dismantle any parts.
- Rags and absorbent pads: For cleaning up spills immediately.
- Safety gear: Gloves, safety glasses, and protective clothing.
- Funnel: To help transfer any fuel without spills.
- Basic tools: Screwdrivers, pliers, and any specialty tools recommended by your vehicle’s manual.
Having everything at hand before you start will make the process smoother and safer.
Step-by-Step Instructions to Drain Your Fuel Tank
1. Prepare Your Work Area
- Clear the Area: Make sure there is plenty of open space and no potential sources of ignition nearby.
- Lay Down Absorbents: Use rags or absorbent pads around your work area to catch any accidental drips.
- Ventilation: Ensure there is adequate airflow to disperse any fumes that may accumulate.
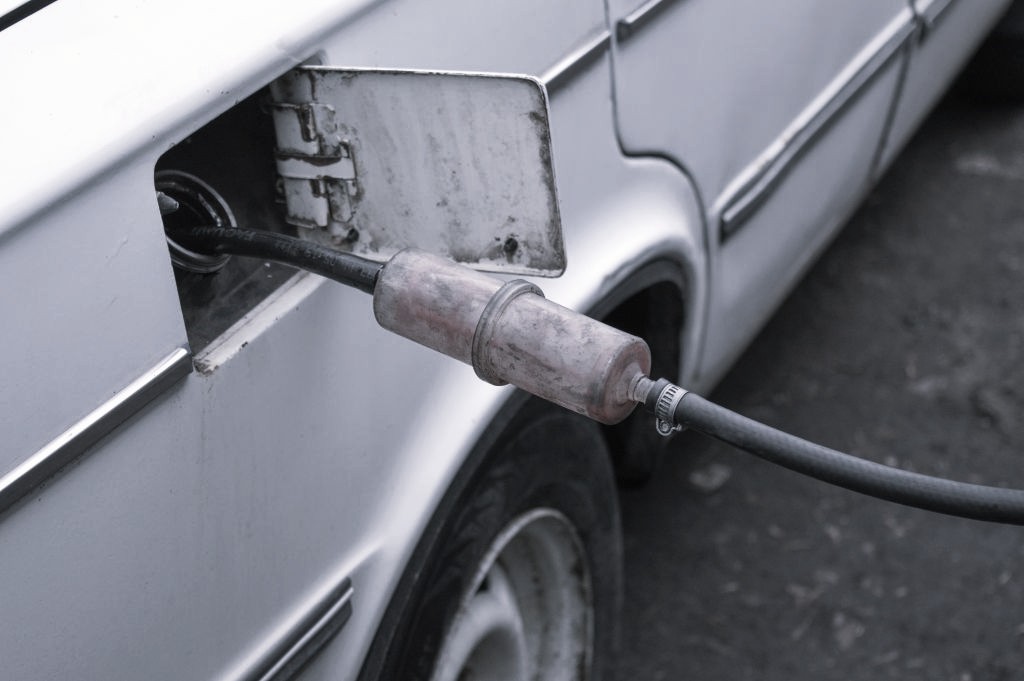
2. Locate the Drain Plug or Fuel Line
- Consult the Manual: Your vehicle or tank may have a drain plug at the bottom. If not, you might have to disconnect the fuel line.
- Identify Access Points: Look for the lowest point on the tank where fuel naturally collects.
Related: What’s the Best Fuel to Stockpile for Survival?
3. Position Your Fuel-Safe Container
Place your approved container under the drain plug or disconnected fuel line. Ensure it’s stable and large enough to hold all the fuel you plan to drain.
4. Draining the Fuel
- Using a Drain Plug: Loosen the plug slowly using the correct size wrench. Allow the fuel to flow into your container. Keep your hands and tools clear of the fuel stream.
- Using a Siphon Pump: If your tank doesn’t have a drain plug, insert the siphon pump tube into the tank’s fuel line. Follow the pump’s instructions to start the siphoning process.
- Be Patient: Fuel might drain slowly. Do not rush the process by applying additional force to the plug or pump.
5. Monitoring the Process
- Watch the Flow: Keep an eye on the fuel level in your container. Do not let it overflow.
- Stop When Empty: Once the fuel tank appears empty, or you’ve drained as much as needed, close the drain plug securely or remove the siphon pump.
After Draining: Disposal and Next Steps
Once the fuel is drained, your work isn’t over:
- Fuel Storage/Disposal: If the fuel is clean and usable, store it in a safe, approved container. If the fuel is contaminated, follow your local hazardous waste guidelines for proper disposal.
- Clean the Tank: Use a fuel tank cleaning solution if needed to remove any remaining sediment or water.
- Inspect the System: Check for any damage or corrosion inside the tank. This is a good time to replace fuel filters or inspect other fuel system components.
- Reassemble and Test: Once everything is cleaned, reattach any disconnected components and test the system to ensure everything is functioning properly.
Draining a fuel tank may not be the most exciting part of prepping, but it’s a skill that can save you from serious problems down the road. Whether you’re storing a vehicle, cleaning out contaminated fuel, or just preparing for long-term resilience, knowing how to do it safely and efficiently will keep you one step ahead.
You may also like:
 How Much Does it Cost to Bulletproof Your Car?
These Fuel Storage Mistakes Could Kill You
How To Make Your Own Fuel
Is It Possible to Make Your Car EMP Proof?
Read the full article here