The prospect of making soap is a bit intimidating to some people. To others, it’s a complete mystery how to combine ingredients to make something that not only lathers into suds but can actually clean things. While some soap recipes are in fact complex, Castile soap is actually quite simple.
The primary benefit associated with Castile soap is its gentleness. That’s largely due to the fact that it’s made with olive oil and has no harsh additives or other chemicals that show up in other types of soap. It’s used for both bathing and laundering and does not strip away essential oils from the body when used.
What’s curious is that even Castile soap is made with lye which is a caustic soda that requires special handling. Fortunately, the saponification process that we’ll detail later neutralizes the harshness of caustic soda, making Castile soap and most other soaps safe to use.
Want to save this post for later? Click Here to Pin It On Pinterest!
Soap 101
Soap is essentially a combination of fat and lye. The fats vary from animal fats to various seed oils and, in the case of Castile soap, olive oil. The lye is another story.
Lye is actually a toxic chemical that emerges far on the alkaline side of the pH scale. The pH scale ranges from 0 to 14 with acidic elements moving towards the 0 end of the scale, and the more alkaline substances moving towards the 14 end of the scale.
Most things fall somewhere in the middle, but elements at the extreme end of the pH scale are equally toxic. Hydrochloric acid has a pH of 1.1 and is not only toxic but can be deadly, causing deep burns and scarring of the skin, and blindness if splashed in the eyes.
But the other end of the scale is no less cautionary. Lye has a pH of 13 to 14, putting it squarely towards the end of the scale, and has the same dangerous attributes leading to burning, scarring, and blindness if splashed into the eyes.
We’re actually going to be using a concentrated form of lye known as a caustic soda, or sodium hydroxide.
It’s hard to buy at a store but you can buy sodium hydroxide online specifically for soap making.
We’ll cover the ways to work with sodium hydroxide and the safety steps to take when using it. Castile soap making may be easy compared to other methods, but it still has its dangers when it comes to lye.
Related: How to Make Soap from Fat and Ashes
Cold Process Soap Making
What we’re going to use is a cold process for soap making. This cold process does not require heat from a stove or heat source for soap making, but instead relies on the chemical interaction of the ingredients to create the soap.
More Than You Want to Know About “Saponification”
Saponification is the chemical and physical process that turns fat and lye into soap. It involves the careful use of chemical heat (a result of the chemical reaction from the ingredients) and cautious and steady stirring.
What saponification accomplishes is a chemical reaction that bonds fatty acids to sodium salts to make what we know as soap. In actual fact, “sapo” is Latin for soap and the root of the term, “saponification”.
You can learn more here: How to make Soap – Cold saponification process for beginners
Understanding “Trace”
Trace is a description of a characteristic you are looking for when you are mixing and stirring your soap in the early stages. It’s when the combination of lye and fat start to thicken and become either clear or at least a uniform color without streaks.
A trace test is when you lift a spoon (or a hand mixer) from the pot and the mixture falls from the spoon in a long, continuous string. That’s when the saponification has occurred and you’re ready to pour your soap mixture into molds to make bars of soap.
More Details: All About Trace in Cold Process Soap
Hardening and Curing
It takes about 48 hours for the soap to harden in the molds, but you’re not done yet. After soap bars are removed from the mold, they need to cure. The best way to do this is on a sheet of parchment paper on a board or tray, stored in a dry space for anywhere from 4 weeks to 4 months.
If you are molding your soap as a brick with the intention of cutting it into bars, the time to do that is after the initial 48 hours. As the soap cures, it will be harder to cut into bars.
Soap should cure at a minimum for 2 weeks before use, but the longer the cure before wrapping or packaging, the harder the soap and the longer it will last with continued use.
Here’s more info: Curing handmade soap
Adding Fragrance
If you’re just making basic soap, you really don’t need to add any fragrances. Then again, it’s easy to do and some people like the idea of a fragrant soap. There are essentially two ways to add fragrance.
One way is to stir in a small amount of essential oils after the soap has traced and before it’s poured into the molds. Which essential oil you use is up to you, and when it comes to soap making, a little goes a long way,
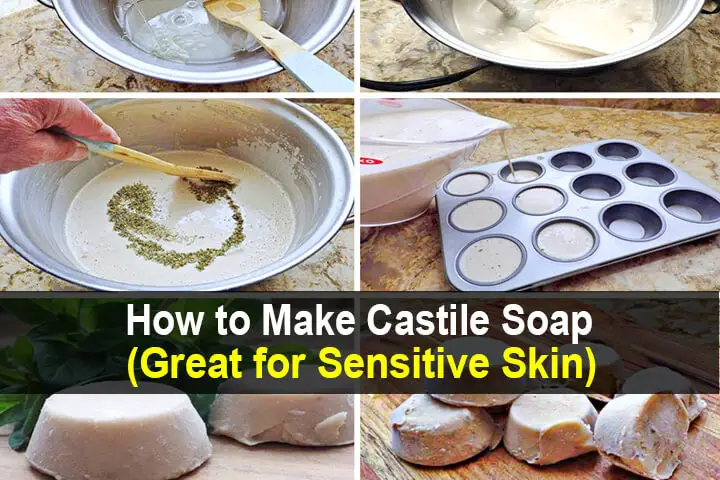
Another way it to add crushed, fresh herbs after tracing. The heat will help release some of the fragrance from the herbs and the bits of herbs will actually act as a mild exfoliant when the soap is used.
Herbs often used for soap making include lavender, rosemary, chamomile, eucalyptus, lemon grass and mint. Citrus fruit peels from lemon and orange zests have also been used to add a fragrance, and some astringent properties to soap to boost cleansing power.
“Exfoliants” Defined
An exfoliant is a mildly abrasive ingredient, sometimes added to soap bars to further scrub the skin to remove dead, flaky skin cells and in some instances, dirt, grease or grime. A brand of soap known as Lava has pumice added as an exfoliant.
Whether or not you add an exfoliant to your castile soap is up to you, but even the addition of something as mild as bits of fresh herbs will give a soap exfoliant properties. Other types of exfoliants sometimes added to soaps include coarse salt, poppy seeds, oatmeal, used coffee grounds, tea leaves and sandalwood powder.
Here’s more on exfoliating: How to Make Exfoliating Cold Process Soap
About Soap Molds
The final step in the process is pouring your soap into molds to form bars. The shape is up to you. You can buy soap molds or make your own.
Some people use cupcake trays. The silicone trays are best because they make it easy to pop out the soap bars when they’re dry.
Another technique is to pour the soap into a square baking pan or wood frame as a large brick as high as you want your soap bar to be.
After the soap has dried, the brick is cut into any shape you want for your final soap bars.
We’ll cover a variation for a liquid castile soap that doesn’t require a mold, but most people like the convenience and portability of a bar of soap.
More on soap molds: How to make soap mould at home | DIY homemade soap mould
Important Safety Tip: Any utensils or molds used for soap making should never be reused for conventional cooking. If possible, reserve all equipment for future soap making only.
Making Castile Soap
We’re going to cover the basic steps for making Castile soap and then offer some variations on the recipe that add fragrances and/or exfoliants. The recipes may vary, but the process is the same and should be applied with all potential ingredients.
Step 1: Assemble Your Ingredients
INGREDIENTS:
OPTIONAL:
- Fragrances either from essential oils or fresh herbs
- Exfoliants either plant-based like oatmeal, herbs or coffee grounds, or minerals like pumice or sandalwood powder
Step 2: Assemble Your Equipment
EQUIPMENT:
- Measuring cups
- Measuring spoons
- Stainless steel pot (a plastic bucket can also be used because any pot used for soap making should not be reused for cooking)
- Molds for soap bars
- Wooden spoon for stirring (a wooden paint mixing stick works just as well and is easily disposable)
- Funnel for filling the molds
SAFETY EQUIPMENT:
- Goggles or eye protection
- Face mask or dust mask
- Nitrile gloves
Step 3: Add Water and Caustic Soda to the Pot or Bucket
Measure and pour 16 ounces (2 cups) of water into the pot or bucket.
Put on your safety gear (goggles, face mask, gloves) and slowly and carefully sprinkle in 1 cup of caustic soda to the water while gently stirring with a wooden spoon. The combination of caustic soda and water will start to get very hot as a chemical reaction occurs.
Place the pot either on the stove or on a trivet to avoid burning surfaces or countertops.
Stir the caustic soda and water to dissolve the caustic soda. If some crystals don’t dissolve, add a tablespoon of water and continue stirring until all caustic soda is dissolved.
Allow the dissolved mixture to sit and set for one hour. Make sure there is something under the pot or bucket because the sodium hydroxide solution will get very hot as the chemical reaction continues.
Important Safety Tip: Never add water to the caustic soda. It will cause a small explosion that will burn exposed skin. Always add the caustic soda to the water slowly and in small amounts.
Step 4: Add Olive Oil to the Soda/Water Mix
After the caustic soda solution has set for an hour, slowly drizzle 8 cups of olive oil into the soda/water mix, stirring constantly with your wooden spoon. (You’ll either want to discard the wooden spoon after you’re done or reserve it for future soap making only. Never use it again for cooking).
Continue to stir constantly and always in the same direction. This can take a long time, up to an hour or more. You can take breaks and come back to it, but you want it to achieve the consistency of honey or a thick, uniform batter. This is saponification in action.
Tip: A way to accelerate tracing is to use an electric hand-mixer. However, the general recommendation is that any cooking utensil that comes in contact with caustic soda during the early process of soap making not be used again for food preparation. A link below covers some ways to safely clean up after soap making.
Lift the spoon (or hand mixer) from time to time and see if the mixture dripping from the spoon forms a long string rather than drops.
This is a characteristic of a proper trace that tells you the soap mixture is ready to be poured into the molds.
If you are adding a fragrance as an essential oil or chopped herb, now is the time to mix them into your traced soap mixture.
Stir until evenly blended.
The amount of essential oil you add varies depending on the oil, but the measures range from drops up to a teaspoon.
The link below gives you some good estimates for how much essential oil to add to any soap recipe, but on average the amount does not exceed 3% of the total weight or volume of the soap mix. Ultimately, the amount of fragrance is up to you but too much could produce an allergic reaction.
The amount of herbs for the recipe we’ve described is usually measured as a teaspoon or two. You can chop fresh herbs or use dried herbs. A tablespoon of herbs is about right for this recipe.
If you are adding an exfoliant to your soap, now is also the time to stir that into your soap. A tablespoon of any exfoliant is a good place to start, and you can vary the amount to suit your needs for future batches.
Step 5: Making the Soap Bars
You can remove your safety equipment at this point. The saponifaction process has neutralized the caustic soda as the fat molecules from the olive oil has bonded to the soda molecules and rendered them harmless.
Carefully pour your soap into your mold.
If you have small molds you might need a funnel to direct the soap into each mold.
Place the mold in a dry spot and let dry for 48 hours undisturbed.
After 48 hours, release the soap from the mold and allow to cure, or continue to dry and harden for at least 2 weeks and up to 4 months.
Wrap the soap bars either in parchment paper or plastic wrap and store.
Variations on Castile Soap
Some variations on Castile soap include a liquid version and alternatives to caustic soda as a catalytic agent for saponification. Some of these approaches are easy and some get a bit complicated, especially when you’re trying to implement a lye substitute.
Rather than go into excruciating detail, here are various links to videos and articles that cover these variations.
ARTICLES:
VIDEOS:
Experiment
After you’re made your first batch of soap it’s possible you’ll do it again in the future. That’s the time to experiment with other soap recipes, Castile soap variations, and various alterations related to fragrances, exfoliants and other unique properties.
You could also try experimenting with lye alternatives like heating baking soda and other chemicals to achieve saponification. As time goes on you may find you never have to buy soap again.
Like this post? Don’t Forget to Pin It On Pinterest!
You May Also Like:
Read the full article here