Congratulations! Since you’re here, you’ve obviously taken the first and often most difficult step to becoming better prepared and more resilient. That first step is recognizing that we live in an unpredictable world. Like the millions of others who have come before you, you’re tired of the anxiety, worry, and concern that comes with our modern world. You want to be prepared but don’t know where to start and are wondering how to start prepping.
Well, that’s where I come in. I’m here to make it easy for you. Hi, I’m Brian Duff. In addition to being a lifelong prepper, I’m a former lifeguard, firefighter-paramedic, Army Ranger, and international security director. I’ve traveled the world keeping others safe in the most inhospitable locations and circumstances. Now, I’m doing that for you with this step-by-step guide.
This guide will remove the overwhelm and uncertainty of how to start prepping. It takes all the guesswork out by telling you exactly what you need to do. All that’s required of you is the few minutes it takes to read the information and a willingness to take action. Now, let’s get started prepping!
Step 1: Understanding Preparedness
To start with, you need to understand what preparedness is. I define preparedness as:
All the efforts taken to ensure survival, minimize unwanted struggle, and live your best possible life.
That’s it. Ultimately, the concept of preparedness is pretty simple. It’s everything you do to help you and your family members live your best possible lives. That’s why you’re here now: to be more resilient as you go through everyday life.
Being Prepared Does Not Make You a Prepper
Many people worry that becoming prepared will get them labeled as a prepper. There’s nothing further from the truth. Being preparedness-minded does not mean you’re a prepper. It simply means that you are taking some basic common-sense actions to protect your family and friends when it matters most.
Prepping is Empowering
Please know that people often feel anxious, concerned, or fearful when they first start preparing. If that’s you, don’t worry, you’re 100% normal. Fortunately, that will fade as you become better prepared.
That’s because being prepared to face life’s adversity is empowering. Knowing you’re ready with the basic supplies and the self-reliance know-how builds confidence while dissolving the worry that comes with not being prepared. You’re on the right track and in good hands.
Here’s a Motivating Article I Wrote on the True Meaning of Preparedness
Disclaimer: This article contains affiliate links, for which I may receive a small commission at no cost to you if you choose to purchase a product through a link on this page.
Step 2: Build Your Basic Emergency Kit
Many people place building their basic emergency kit farther down the how-to-start prepping list. However, I want to give you a quick preparedness win. I want you to know that you have the things you need to face a disaster should one happen.
This is a list of the emergency supplies that you’ll need, regardless of where you live. They are universal to preparedness.
Note: Most of the items have Amazon product links, so you can easily access them and build your kit. I’ve added them to my Amazon storefront to make getting what you need easier.
1. Clothing
Our first line of defense against the elements is what we have on our bodies. When it comes to our bodies, we can lose 45% of our heat through our heads. Therefore, I always pack a hat in my emergency.
Hats
In my case, I pack two hats. The first is an Outdoor Research Sun Runner Cap because it keeps the warmth in and the sun out of my eyes and off my neck. The second is a wool beanie cap, which is great when it’s cold out.
Shirt
I also pack a hooded, long-sleeved SPF shirt. They work great to keep the sun off, and in the winter, they make a decent baselayer to keep the heat in. Here’s a well-reviewed hooded SPF shirt option for the ladies.
Here’s a Helpful Article About Layering Clothes
Socks
Accompanying the SPF shirt are two pairs of socks—one to wear while the other is drying out. A tip to remember is that socks can be used as ad-hoc gloves to keep your hands warm.
Scarf
The final piece of clothing that I pack in my kit is a cotton scarf—often referred to as a shemagh. This large scarf has many uses, such as a sun covering, towel, water filter, and more.
Check out this article for more information on the shemagh.
2. First Aid Kit
Cuts, scrapes, and injuries go hand-in-hand with disasters. Therefore, having a first aid kit ready to go is vital when disaster strikes. The fastest, most convenient way to get your first aid supplies set is by purchasing a done-for-you kit. This first aid kit comes with enough supplies to cover most of your first aid needs.
Pro-Tip: In addition to the basic first aid supplies, you should also add your family’s personal medications and copies of your prescriptions to your kit.
3. Shelter
The goal is to provide protection from the environment. You want to be able to keep yourself warm and dry in the winter and cool and shaded in the summer.
Army Rain Poncho
Lastly, I always pack an army-style rain poncho in my kit. I love rain ponchos because they have multiple uses. Besides keeping you reasonably dry, they can work as a shelter or a bed and have a number of other uses.
Pro-Tip: I learned this lesson during my years as an Army Ranger: pack a poncho liner. Like a rain poncho, a poncho liner has a variety of uses and is an excellent piece of survival gear.
For More Poncho Information, Here’s an Article I Wrote About Army Poncho Liners.
Something to Sleep Under, In, and On
If you find yourself in the unfortunate position of not having a shelter (building or vehicle) to sleep in, you’re going to need to create one. Fortunately, there’s a simple mantra to help you when it comes to creating a shelter. You want something to sleep under, something to sleep on, and something to sleep in.
Ideally, if you don’t have a room or vehicle to sleep in, you’ll have an easy-to-pack tent available. However, if you don’t have a tent, you may be forced to create a field-imperative shelter. If so, you’re fortunate that you’ve packed your rain poncho. Other options are simple mylar blankets, a low-cost tarp from Amazon, or a multifunctional tarp.
Next, you need something to sleep in. While a good sleeping bag is the best choice, they’re big and don’t fit every person’s kit. In that case, there are many great products made for this. When it comes to the best bang for your value dollar, the bivvies made by SOL and Survival Frog are excellent options.
Lastly, the ground can suck the heat out of you. So, you’ll need something to sleep on to insulate you from the ground. There are a couple of options for this. If you have a second bivvy sack, you can fill it full of leaves, dried grass, etc. Likewise, an extra survival blanket laid over a pile of leaves can also work as an insulator.
Read This Article for More Information on Emergency Shelters!
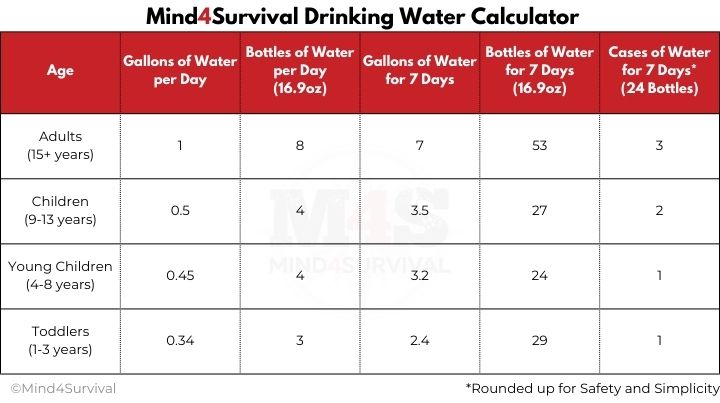
4. Drinking Water
Staying hydrated is a necessity. When it comes to drinking water, it’s good to plan for each adult to consume about one gallon (128oz) of water per day. The easiest way to meet your hydration needs is by stocking up on cases of store-bought water bottles. They’re fairly easy to store in a closet and move to your car. Plus, they don’t cost much, and as individual bottles, they’re easy to slide into a pack.
A typical bottle of store-bought water is 16.9oz, which is about eight bottles per gallon. In other words, a case of 24 water bottles should last the average adult three days. Seven days will require just over two cases for a single adult—three cases if you round up for safety’s sake.
Children require less water. For example, a ten-year-old requires about half a gallon (four 16oz bottles) per day. Therefore, a ten-year-old will need just over a case of water every seven days.
Bear in mind that these figures are for your average drinking water needs. The amount of required drinking water will fluctuate based on a person’s activity level, the air temperature, etc. Likewise, they do not include water for hygiene, cleaning, or anything else. If you feel you need additional water, be sure to take that into account.
Drinking Water Calculator
I’ve created this handy table to help you calculate how much water you need based on your individual situation.
Drinking Water Container
Having the ability to get clean drinking water when it’s available will extend your water supply. With that in mind, you’ll need a container to gather and store water.
The most cost-effective water container is the trusty, wide-mouth Nalgene bottle. Keep in mind that the typical 32-oz Nalgene bottle only holds one-quarter of an adult’s daily 128-oz drinking water needs. So, you may want to consider having more than one.
An option to increase your capability is to include a single-wall metal water bottle. Doing so increases the amount of water you have available. A single-wall metal container also gives you the ability to boil and purify your water.
Pro-Tip: Add a sillcock key to your kit. A sillcock key is a tool for turning on a variety of water faucets.
Water Gathering, Purification, and Storage
Depending on your situation, you may decide you want the ability to gather, purify, and store water. I recommend this as a back up to any water you have on hand.
When it comes to purifying water, there are a couple of cheap and easy options available. One is a Lifestraw water filter. These are super-effective. Simply fill your bottle, stick the Lifestraw in, and drink. They even allow you to drink straight from a puddle or other water source.
The other basic option is water purification tablets. Simply add the tablets to a quart of water, wait 30 minutes, and it’s ready to drink. An essential point to remember is that water purification tablets kill the things in the water that make you sick. However, they don’t get rid of the crud that’s in the water. So, a helpful water purification tip is to use a t-shirt or other cloth to pre-filter your water.
Here’s a Good Article About Water Purification.
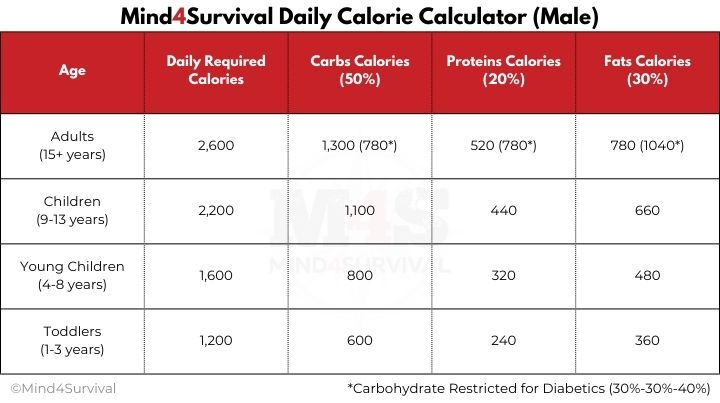
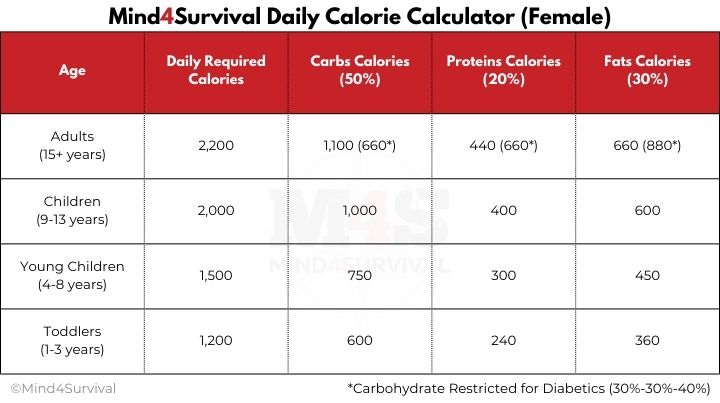
5. Food
Successfully dealing with stressful situations requires energy. The energy to power your body comes from calories. Without ingesting calories, you will lose energy, focus, and effectiveness. Therefore, planning for your nutritional needs is a must when building your kit.
Basic Emergency Food Prepping
2000 calories per day is the basic food prep guideline that many in the preparedness community follow. I suggest staring with the S.O.S. Rations Emergency 3600 Calorie Food Bar. These are what I pack in my emergency bags as the foundation of my emergency calorie needs. They don’t require any prep work to eat and have a five-year shelf life, making them ideal for any emergency situation.
Gluten Warning: The S.O.S. rations contain gluten. If you or a loved one is gluten-sensitive, consider meeting your caloric needs through other means. Gluten-free food bars and beef jerky are a great place to start.
Calorie Calculators
The S.O.S. Rations are an excellent start. However, some people want to be more exact with their nutritional planning. To help with that, I’ve created the tables below. These calculators give you the information needed to determine exactly what calories and macronutrients people need.
Additionally, I’ve also included low-carb calorie options in case you are prepping for someone who is carbohydrate-sensitive.
Pro-Tip: As you stock your emergency food storage, look for food items that have long shelf lives, require minimal preparation or cleanup, and are nutrient-dense.
Food: Daily Calorie Calculator for Men
Food: Daily Calorie Calculator for Women
6. Fire
After a man-made or natural disaster, starting a fire can be a lifesaver. A fire allows you to boil water, get warm when it’s cold, signal rescuers, heat food, etc.
Lighters and Matches
The easiest method of starting a fire is a standard Bic lighter. While a Bic lighter can be used over and over again, they do struggle when it’s cold and wet. Therefore, it’s a good idea to have a backup fire-starting option. One reliable and easy-to-use backup is Stormproof matches, such as this UCO survival match kit.
Fire Starting Tinder
If you have never started a fire, it may seem easy. However, it can be difficult. To help during those difficult-to-light-a-fire times, I recommend using Wet Fire Tinder. Having some of these fire starters in your kit can be a blessing when you must get a fire started.
Pro-Tip: Add a candle to your fire-starting kit. It acts as both a flame extender to help get a difficult fire going and an additional source of light.
Read This Article for Information on Alternative Fire Starting Methods.
7. Electronics
Light
You need to be able to see at night, so you will need a reliable flashlight. I love this flashlight because it’s portable, rechargeable, and can also operate off AA batteries. In addition to a hand-held flashlight, I always pack a headlamp.
Whereas I can point the handheld flashlight wherever I need it, a headlamp provides hands-free illumination. My go-to headlamps, like this one from Energizer, are rechargeable, water resistant, and offer a red light option to preserve night vision.
Pro-Tip: Glow sticks are great for keeping track of your children and pets at night. Simply bend the stick to activate it. Once ready, attach it to your kid’s belt or your pet’s collar.
Radio
Staying informed is critical during emergencies and survival scenarios. While cell phones are usually excellent, mobile networks can be unreliable during disasters. Therefore, I always include a radio in my emergency preparedness kit. This emergency radio is a great choice because it has multiple charging options and works as a backup light and battery bank.
Pro-Tip: Cell networks can become damaged and overwhelmed during disasters, making it difficult to place voice calls. Text messages, however, require less bandwidth. So, if you can’t get through with a voice call, use text messaging.
Battery Bank
Keeping our electronics powered up is essential. To do that, I use a portable charger, such as this battery bank from Anker. As long as I keep the battery bank charged, I’m guaranteed to be able to keep my phone, lights, and other important electronics up and running.
8. Navigation
It’s important to know which way you’re going. Because there are situations when your GPS may fail, a backup is necessary. The backup to the GPS is the tried and true compass. My go-to compass is the Suunto MC-2, which I reviewed in this article. If the MC-2 is out of your price range, here’s a lower-cost Suunto A-10 compass option.
Pro-Tip: Add a map of your area to your kit and practice using it. That way, you’ll always know where you’re at and where you’re headed.
9. Personal Hygiene Items
Staying clean during a disaster shouldn’t be overlooked. In addition to boosting morale, keeping clean as part of your disaster plan helps avoid illness and infection. So, be sure to add a toothbrush, toothpaste, soap, toilet paper, wet wipes, feminine hygiene products, chapstick, and sunblock to your kit.
10. Tools and Repair Items
Multi-Tool
A multi-tool is an essential part of any disaster kit. A good multi-tool combines several tools into one compact, portable device, making it incredibly versatile and useful in various situations. Choosing a multi-tool like this provides you with a knife, a saw, and a variety of other useful tools.
Cordage
Cordage is the fancy term for rope, cord, string, etc. It allows you to tie things down and lash things together. For example, cordage allows you to tie a tarp to a tree to make an improvised tent. The go-to cordage for survival kits is 550-paracord.
Heavy Duty Tape
Heavy-duty tape, typically referred to as “Duct Tape,” is the multi-tool of tape. This tape is great for securing items, patching holes, and making emergency repairs. My preferred brand of heavy-duty tape when creating survival kits is Gorilla Tape.
Pro-Tip: To store your tape, wrap several wraps of heavy-duty tape around your Bic lighter. Additionally, Gorrila and Duct Tape work well as an improvised fire-starting tinder.
11. Cash
Having the ability to make purchases, especially if there’s a power outage, can be important. Perhaps ATMs are offline, along with credit card machines. Carrying some cash in smaller denominations, such as one’s fives, tens, and twenty’s, may prove useful.
Basic Survival Kit Wrap-Up
Once you have all of these supplies on hand and ready to go, you’ll be prepared to face a wide variety of emergencies. Just so you know, stockpiling enough food and water for seven days will prepare you to face 99.9% of disasters. After all, even during large-scale disasters such as Hurricane Katrina, relief efforts were flowing in within a few days. And if you have at least two weeks of water and food stored, you’ll be better prepared than just about everyone.
When it comes to your survival kit, I recommend consolidating everything in a safe and easily accessible location within your home or vehicle. Moreover, I suggest putting as many of your items as possible into a backpack—referred to in the prepper community as a bug-out bag. That way, should the time come that you need to leave with your gear, you’ll have it ready to go.
Pro-Tip: Other than checking them to ensure their functionality and freshness and to top off your batteries, DO NOT use your emergency supplies for anything other than emergencies. These are your life-saving emergency supplies. If you or others take things out of your emergency supply, then odds are, you’ll be missing things when you need them most. Don’t do it!
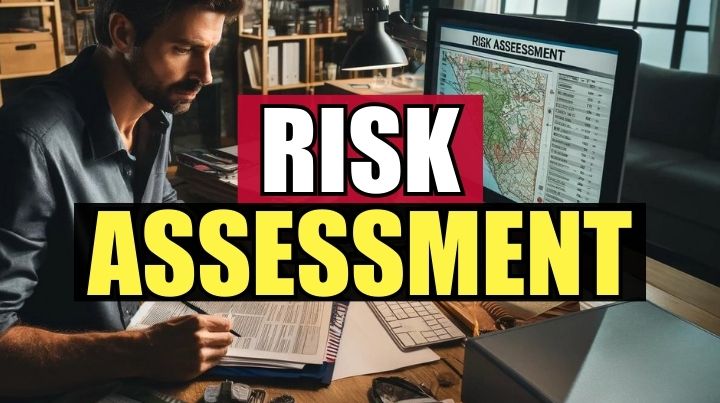
Step 3: Assess Your Risk
Now that you’ve got your kit of basic supplies, it’s time to examine your unique situation. That requires a candid assessment of your risk. This is often referred to as conducting a personal risk assessment. Understanding your risks will help you shape your overarching prepping strategy.
Determine What You Have to Protect
Start your risk assessment by determining everything you have to protect. Obviously, you have to protect yourself, your loved ones, and your supplies. What else do you need to protect?
Identify Potential Threats
Consider the problems most likely to occur in your area. Are they natural disasters such as hurricanes, earthquakes, or fires? Perhaps they’re man-made threats such as power outages, civil unrest, crime, or something else?
Name Your Vulnerabilities
Our vulnerabilities show you where you can improve your preparedness. Basically, a vulnerability of one degree or another is an absence of preparedness to one degree or another. Vulnerabilities can be a lack of resources and supplies, systems and procedures, and knowledge and experience.
One way to determine your vulnerabilities is to ask yourself, “What if?” What if a disaster happens while the kids are in school? What if someone breaks into the house while you’re sleeping? What if you lose your job or source of income? What if supply chains stop working and food becomes scarce? What happens if a loved one breaks down while on a road trip? It’s the what-if questions in response to our risk assessment that help us form our emergency plan and direct our preparedness.
Read this article for more in-depth information on conducting risk assessments.
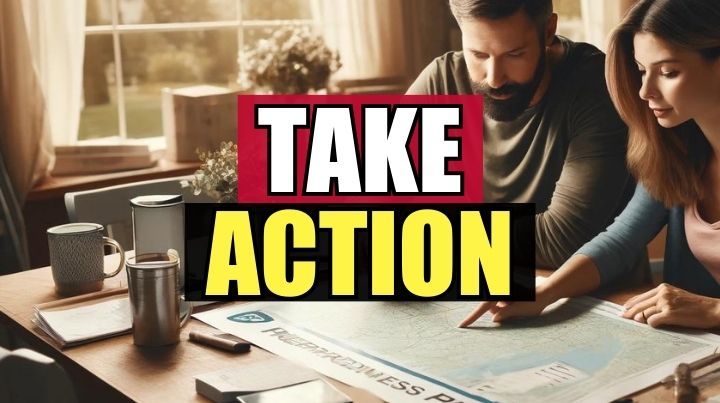
Step 4: Take Action
Now that you know your risks and where your preparedness can be improved, it’s time to take action. Ultimately, as you take action and your preparedness increases, your risk decreases. That’s a great thing!
Plan
Start by planning the most effective ways to address your vulnerabilities. Whether that’s improving your core survival skills, upgrading your supplies and gear, or revising your emergency preparedness plan. As you plan, think about having backups to your plan.
For example, if you live in an area prone to wildfires, what’s your backup plan if the way you normally get home from work is blocked? Which way will you go if you’re alternate route home is blocked?
When planning, keep in mind that your goal is to increase your capability, which decreases your vulnerability. Because capability is made up of your mindset, knowledge, skill, and resources—anything you do to improve any of those factors decreases your vulnerability.
Doing what you’re doing right now, by learning more, is increasing your knowledge. Likewise, practicing a home fire drill or how to use some of the gear you bought for your emergency kit will increase your skill. Speaking of the gear in your kit, those are your resources, just as time and money are. And by recognizing the need for preparedness and approaching it in a positive manner, you’re improving your mindset.
Read This Article to Understand How to Plan for Contingenices!
Don’t Worry! You’ve Got This!
While on the topic of mindset, be mindful that this is often the time when people feel overwhelmed because they feel totally unprepared. As a result, they ineffectively spend a lot of money on their preparedness, running up credit cards and going into debt. Do not do that! Slow and steady wins the race.
Because you know your vulnerabilities and threats, you know your most significant personal risks. Therefore, look at the threat you’re most vulnerable to and plan how to address it. Save money, budget for it, and phase it in. The great thing about prepping is that a rising tide raises all boats. In other words, what you do to prepare for one risk will likely decrease your vulnerability to other risks.
For example, if you believe a job loss is your greatest risk, creating an emergency fund is a great idea to prepare for it. By increasing your savings account in case of a job loss, you now have a buffer against a vehicle problem. Since you live in a hurricane-prone area, having a vehicle that runs well is a key part of your plan. Therefore, your effort to address a job loss is, by default, making you more prepared to deal with a hurricane.
Act
Now, start implementing the plans you’ve created to address your potential risks. When you have your emergency kit all together, take it out in the yard or go camping and try it out. Hang that tarp up. Pull out the map and go for a hike to practice with your compass. Take time to drive your alternate evacuation routes. Increase your short-term food storage. Talk with your family about what to do in an emergency. Watch YouTube videos and take classes on topics that you need to learn more about. Remember, taking action lowers your vulnerability.
Assess
As you decrease your vulnerabilities by improving your preparedness, you must constantly assess and reassess your efforts. In effect, this involves continuous learning about the relationship between your capabilities and vulnerabilities.
Are your plans effective? Ar the actions you’re taking working to lower your risk. Has the situation changed?
For example, you stocked up on water and adopted a new fur buddy. Do you have enough water stored to ensure Fido stays hydrated? Do you need to adjust your preps?
A new mall has made the route you typically use to pick up your kids from school a congested madhouse. Is there a better route?
Perhaps your greatest risk was a burglar breaking into your home. Now, due to your efforts, that’s no longer your greatest risk. What should you focus on now?
Once you assess that your situation has changed, it’s time to reassess your risk. Then, with your new risk profile, adjust your plans and actions accordingly.
The Bottom Line on How to Start Prepping
And that’s it. That’s how to start prepping in a nutshell.
I’m impressed. The fact that you made it to this point tells me you’re well on your self-reliant, prepping journey. That means you’re willing to be your own first responder. No matter what, you want to be ready to face any problems that arise with only a moment’s notice. That’s a great place to be.
Again, congratulations on taking the leap to ensure that you and your family always have the ability to live their best possible lives—regardless of the circumstances.
Do you have any questions or suggestions about how to start prepping? Please post them in the comments below.
Additional Resources
Stay safe,

Read the full article here